Hi all,
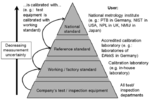
I'm looking for some information/advice about calibrating metrology equipment. I want to know if there is a standard for how calibration should flow downwards from certified standards.
For example: you have a glass ruler, gauge blocks, microscope, calipers, micrometers, pin gauges, profile projector, etc. Which of these should you calibrate in-house with the metrology equipment you have and which would be the most cost-effective to send to be calibrated and certified.
In this example you could have the profile projector externally calibrated, then use that to calibrate the gauge blocks, then use those to calibrate the micrometers and calipers, then use those to calibrate the pin gauges. You could also use the profile projector to calibrate the glass scale, then use that to calibrate the microscopes, etc. I guess my question is, it seems impossible to in-house calibrate everything so what's the most useful piece of equipment to get done externally?
Also, I've learned that you cannot calibrate item one via item two and then later use item one to calibrate item two but could there be a cyclical effect? Item 1 is used as a standard against item 2, item 2 for item 3, item 3 for item 1?
I've received no formal training or education in calibration and maintaining a calibration lab, and no one has held this position at my company in 10 years. We are looking to be ISO certified. If anyone has any free resources for what I'm sure are basic questions I'd greatly appreciate them.

